
Introduction:
When it comes to optimizing your workspace, few things are as satisfying as a well-organized desk. And if you’re looking to make a change that can significantly impact your setup, removing a keyboard tray is a smart move. Whether you’re upgrading to a new desk or simply reconfiguring your workspace, learning how to remove a keyboard tray from your desk can open up new possibilities for a clutter-free, efficient setup. In this guide, we’ll walk you through the process step by step, ensuring you have a seamless experience while optimizing your desk space.
Step 1: Gathering the Right Tools:
Before you begin the removal process, it’s essential to have the necessary tools on hand. To ensure a smooth operation, gather a Phillips-head screwdriver, a flat-head screwdriver, and a soft cloth. Having the right tools will make the entire process much more efficient and manageable.
Step 2: Clearing the Workspace:
Begin by clearing your desk and removing any items that might obstruct your access to the keyboard tray. This step ensures a safe and unobstructed work area while you remove the tray.
Step 3: Disconnecting Cables:
If your keyboard tray has any cables or wires attached, such as for a keyboard or mouse, disconnect them carefully. Organize and label the cables if needed to ensure you can easily reconnect them after the removal process.
Step 4: Locate and Remove Mounting Screws:
Most keyboard trays are secured to the desk with mounting screws. Using the Phillips-head screwdriver, locate and remove these screws. They are usually found on the underside of the desk, attaching the tray to the sliding mechanism. Keep these screws in a safe place, as you may need them if you decide to reattach the tray later.
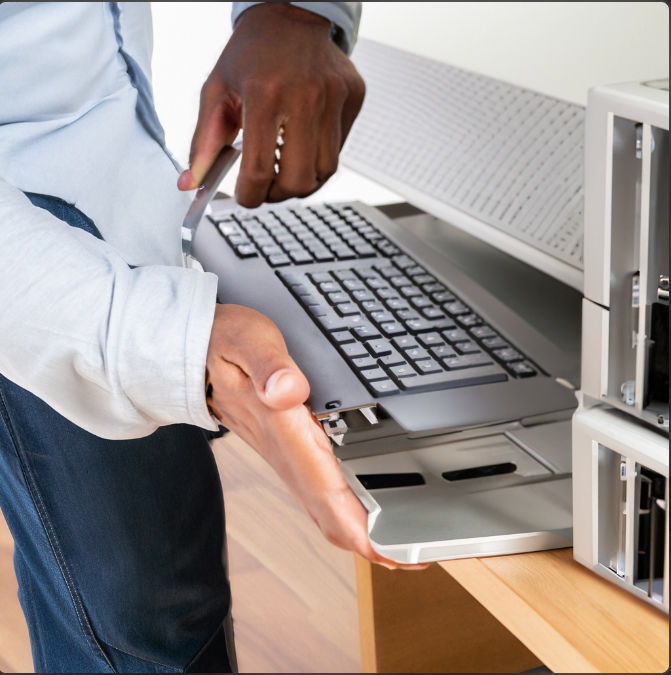
Step 5: Detaching the Tray:
After removing the mounting screws, gently slide the keyboard tray outwards from under the desk. Be cautious and proceed slowly to avoid any sudden movements. As you slide the tray out, you’ll notice that it detaches from the sliding mechanism.
Step 6: Removing the Sliding Mechanism:
With the keyboard tray detached, you can now focus on removing the sliding mechanism. This step might involve more screws, so use the flat-head screwdriver to carefully remove them. Set the sliding mechanism aside, as you might want to keep it for future use or repurpose it in another project.
Step 7: Cleaning and Finishing Touches:
With the keyboard tray and sliding mechanism removed, take a moment to clean the area under the desk. Wipe down any dust or debris using a soft cloth. This is also a great opportunity to evaluate your workspace and consider any additional adjustments or improvements you might want to make.
Conclusion:
Removing a keyboard tray from your desk is a straightforward process that can lead to a more organized and functional workspace. By following these steps and using the right tools, you can ensure a smooth and hassle-free removal experience. As you embark on this journey, remember that the end goal is a workspace that suits your needs and enhances your productivity. With your keyboard tray removed and a well-organized desk in place, you’ll be ready to tackle your tasks with renewed focus and efficiency.
FAQS of Removing Keyboard Tray From Desk
Q1: Why would I want to remove a keyboard tray from my desk?
A1: Removing a keyboard tray can help you optimize your workspace by creating more desk space, allowing for a cleaner and more organized setup. It also gives you the flexibility to customize your desk to your preferences.
Q2: Can I reattach the keyboard tray later if I change my mind?
A2: Yes, in most cases, you can reattach the keyboard tray if you decide to. Keep the mounting screws and sliding mechanism in a safe place for future use.
Q3: Do I need any special tools to remove a keyboard tray?
A3: Basic tools like a Phillips-head screwdriver and a flat-head screwdriver are usually sufficient for removing a keyboard tray. Having these tools on hand will make the process smoother.
Q4: Will removing the keyboard tray damage my desk?
A4: When done correctly, removing a keyboard tray should not damage your desk. However, it’s important to follow the steps carefully to avoid any mishaps. If you’re unsure, consider seeking assistance from someone experienced.
Q5: How do I ensure the cables don’t get tangled while removing the tray?
A5: Before you begin, disconnect and carefully label the cables attached to the keyboard tray. This way, you’ll know exactly where to reconnect them after the removal process.
Q6: Can I repurpose the sliding mechanism after removing it?
A6: Yes, you can repurpose the sliding mechanism for other projects if you choose. It’s a versatile component that can have various uses beyond supporting a keyboard tray.
Q7: What if I encounter difficulties during the removal process?
A7: If you encounter any difficulties while removing the keyboard tray, consider consulting the manufacturer’s instructions or seeking advice from experienced DIY enthusiasts. If necessary, you can also reach out to professional furniture assemblers for assistance.
Q8: Can removing the keyboard tray improve my ergonomic setup?
A8: Yes, removing the keyboard tray can contribute to an improved ergonomic setup. It allows you to position your keyboard and mouse at a comfortable height and angle, promoting better posture and reducing strain.
Q9: Are there alternative options to removing the keyboard tray for a more organized desk?
A9: If you’re hesitant about removing the keyboard tray, you can explore other options like cable management solutions, desk organizers, and monitor stands to create a cleaner and more efficient workspace.
Q10: What should I do with the removed keyboard tray?
A10: Once the keyboard tray is removed, you can decide whether to repurpose it, store it for future use, or recycle it if it’s no longer needed. It’s a good opportunity to declutter your space and make room for what truly enhances your productivity.